I used Bernat Handicrafter cotton yarn in indigo, country red and white. Each hat was done in crochet and mostly done in the double crochet stitch. But each hat is different in the use of color.
Monday, July 30, 2012
Olympics inspired chemo caps
I made 11 chemo caps to send down to St. Judes/Mercy oncology clinic. I barely got them done so my sister could deliver before opening ceremonies.
I used Bernat Handicrafter cotton yarn in indigo, country red and white. Each hat was done in crochet and mostly done in the double crochet stitch. But each hat is different in the use of color.
I used Bernat Handicrafter cotton yarn in indigo, country red and white. Each hat was done in crochet and mostly done in the double crochet stitch. But each hat is different in the use of color.
Friday, July 20, 2012
Helpful Tip from Lion Brand - How do to the Russian join
I have never heard of this. I think I have to learn how to do this. I hate joining and weaving in the ends.
How to Russian Join Yarn in 7 Easy Steps

1. Thread a blunt needle with one end of yarn.
2. Work the needle through the plies of your yarn for a few inches. Don’t worry if this looks bunched up now.
3. Pull your working yarn through, leaving a small loop at the end. This is where the second piece of yarn will be attached.
4. Thread your needle with the second piece of yarn, then insert the needle into the small loop you created before.
5. Pull a few inches of yarn through the small loop.
6. Like you did before, work the needle through the plies of your second piece of yarn.
7. Give each strand a little tug to smooth out the bunching. You now have a secure join! Trim off any excess ends.
That’s all there is to it! Depending on your yarn, you may notice that this joined area is slightly thicker than the rest of your yarn. I find this isn’t very noticeable when I’ve worked my projects, but it’s something to keep an eye on.
How to Russian Join Yarn in 7 Easy Steps
Posted: 19 Jun 2012 06:00 AM PDT
Hate
weaving in ends? The Russian join is an excellent technique for
attaching a new skein of yarn or for changing colors. Best of all, it
creates a secure join, so you can keep crocheting or knitting without
worrying about yarn ends! Here are instructions on how to complete the
Russian join in 7 easy steps. I’ve used 2 different colors of yarn, but
this is a great technique for attaching a new skein of the same color
yarn, too!
1. Thread a blunt needle with one end of yarn.
2. Work the needle through the plies of your yarn for a few inches. Don’t worry if this looks bunched up now.
3. Pull your working yarn through, leaving a small loop at the end. This is where the second piece of yarn will be attached.
4. Thread your needle with the second piece of yarn, then insert the needle into the small loop you created before.
5. Pull a few inches of yarn through the small loop.
6. Like you did before, work the needle through the plies of your second piece of yarn.
7. Give each strand a little tug to smooth out the bunching. You now have a secure join! Trim off any excess ends.
That’s all there is to it! Depending on your yarn, you may notice that this joined area is slightly thicker than the rest of your yarn. I find this isn’t very noticeable when I’ve worked my projects, but it’s something to keep an eye on.
Crochet Flowers
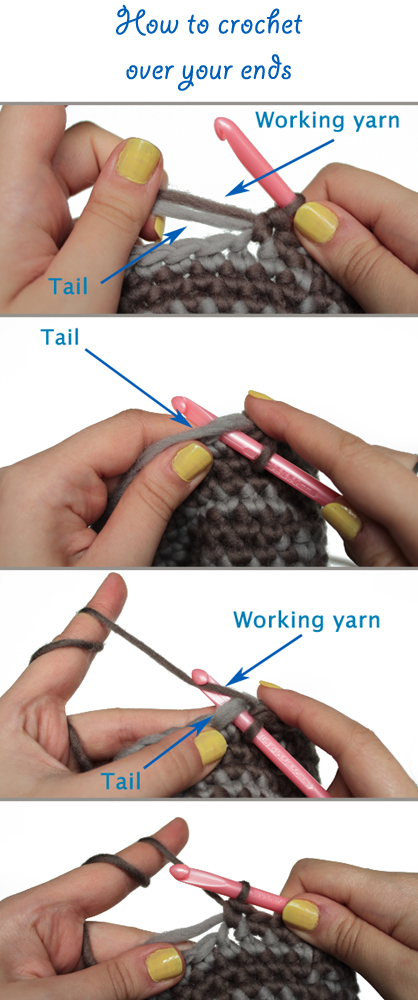
Helpful Tip from Lions Brand - How to Crochet over your Ends
How to Crochet Over Your Ends
May 23rd, 2012 by Jess

Monday, July 16, 2012
Getting started
It's been a slow beginning but we are finally moving forward. Our group is now listed on the national Head Huggers website. We are going to target hospitals, clinics and doctors offices in the Central and Southern Missouri area.
My name is Teresa Krapes. I started crocheting about two years ago. I had only made some baby afghans years ago. I researched crocheting for charity and found the Head Huggers website. Using the patterns there, I made my first chemo caps. And I was hooked. Pun intended!
My first batch of hats was 37 that went to Newborns in Need and the Mercy oncology clinic in Springfield, Mo. My sister, Cheryl, makes the deliveries for Springfield.
She is the other part of "we" for this new group. She is going to try her hand at sewing turbin type caps.
Since that first batch, I have sent down several more batches. I like to do themes. Pumpkin hats for Halloween; cotton for summer; pink bats for October breast cancer awareness, etc.
- Posted using BlogPress from my iPad
Subscribe to:
Posts (Atom)
